
Including your children, while decorating your home, garden or balcony will be both an efficient activity to be done as a family and will contribute significantly to the creativity of children. In this context, children mostly prefer ideas about painting or drawing. Today, I want to share with you a nice idea that you can do with your children; tin can planters.


What do we need for Tin Can Planter Ideas?
With the aim of creating colorful tin can planters, you should have empty tin cans (you can reuse your food cans or you can buy them in-store). In addition, you should have different color paints, regular size painting brush, potting soils, and beautiful plants. You can also use different colored ropes, stones, fabrics, clay mold appliques (for vintage raised design), and covers, depending on your wishes and pleasures.


DIY Ideas for Tin Can Planters
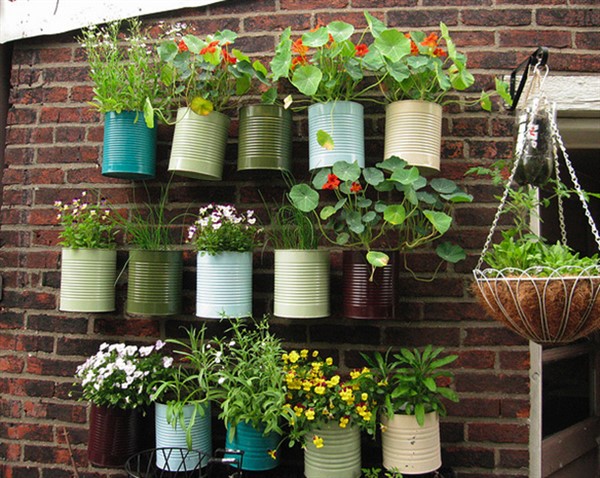
After taking the materials I mentioned above, you can trust the imagination and creativity of you and your children for the next stages. For example, you can paint your tin cans with dots in various colors. Furthermore, you can wrap your tin cans with ropes or you can use a small size of rocks to cover your tin cans. In addition, you can stick your clay mold appliques on tin cans. You can also decorate your tin cans with some animal figure tags. If you want, you can use your tin can with the original color (silver chrome).


After decorating your tin cans as you like, you can make small holes for drainage at the bottom of the cans. Now, you can add some potting soil and your favorite plants. Also, you can create a herb garden for your kitchen (you can plant mint, rosemary, and parsley). I hope you will have a good and effective time while performing this easy and entertaining project.


Images via: FrugElegance, i should be mopping the floor, city farm house, Hgtv, Crafted sparrow, Homeyohmy, Sweet Vintage Designs, vi i villa, Nicole Donaldson, Parties Galore


Love the idea of using tin cans. Where do you get the beautiful paper to put on the cans?
Thanks for your comment. We are happy that you like it. There are different materials for tin can cover. You can find all on the internet.
Here you can find our new article about raised design (clay mold appliques) https://www.balconydecoration.com/clay-mold-appliques-for-tin-can-planters-a-vintage-craft/
What was used on the cans with the raised designs the were turquoise washed and how were they applied.
Hi, thanks for your comment. The designs on cans you asked are craft made. If you want, you can buy them in local craft stores. Good luck
Could you tell us how to make these raised designs if they were craft made?
These metal embossments are also sold readily. There are also aluminum embossing pens (you can find them in online stores). You can make any shape you want with these pens. Alternatively, you can take aluminum foil embossments or make them yourself (I think it is filled with plaster or sawdust-like materials).
Here you can find our new article about raised design (clay mold appliques) https://www.balconydecoration.com/clay-mold-appliques-for-tin-can-planters-a-vintage-craft/
I love these. Are there instructions for the embossed cans?
Hello Pamela, thank you for your comment. The designs on embossed cans you liked are craft made with stones or ready-made mold. If you want, you can use glue to stick on the can or you can buy ready-to-use one in local stores. Have a good day!
Here you can find our new article about raised design (clay mold appliques) https://www.balconydecoration.com/clay-mold-appliques-for-tin-can-planters-a-vintage-craft/
Question: On the raised designs the were turquoise washed and how were they applied.
What are the design called in the craft stores
Here you can find our new article about raised design (clay mold appliques) https://www.balconydecoration.com/clay-mold-appliques-for-tin-can-planters-a-vintage-craft/
Love your ideas thanks !!!!! The cans that you put maybe napkins or paper designs like birds etc did you decopauge???? And what did you use???? Donnah
Thank you very much for your comment. Some cans were decoupaged. You can create an original tin can planter using the materials you have available. Good luck.
I love you Cans!
How do you attach the cans together in that stacked planter with the pebbles glued on the cans.
Hello Beverly Murray, you may use silicone to stick cans together. Have a good day!
Hello Ann, I am just blown away with your artistry and want to beg you to please tell me how you made the label with the wheel barrel and French script on the amber coffee can. It looks like air dry clay with a transfer or something else, or is it a stamp impressed into clay? I am dying to make one of these for myself! Thank you, Sharon
I enjoyed looking at your designs. Perfect recycling project and not heavy to transport. My favorite would be the ones covered in what looks like wallpaper as they could be displayed both outside and inside. Thanx for sharing.