
In our previous post, tin can planter ideas that attracted the attention of many people, a detail that we missed was noticed by some interested visitors. The raised design or appliques on them. This beautiful and easy clay mold appliques idea also attracted our attention. In a short period of time, we have done research on the appliques. Now, I would like to share this information with you.


DIY Materials for Clay Mold Appliques Design
- Paper clay
- Clay molds (plastic or silicone)
- Acrylic paints and compatible sizes of brushes
- Hot glue or any other strong glues
- Tin can (ready to be used as a planter)
- A piece of sandpaper (for distressing)
Note: You can find all these materials in local craft shops and on the internet as well.

DIY Clay Mold Appliques: Step by Step
- After you pull out the paper clay, it will be better to knead it with your fingers so that it gets soften and stick to the clay mold properly (don’t roll it too much).
- Put your clay into the mold and press slightly it to all edges so that it fits well into the mold, and cut off the excess with a knife.
- After you push enough, you should remove it immediately since waiting a little longer can make the clay hard to pull out.
- Cut off the excess and make smooth all the bulges so that it will easy to paint.
- You don’t need to wait until the clay gets dry. Now, you can start to paint your clay applique with any colors that you want such as copper, silver grey, dark grey and etc.
- If you want, you can also distress your clay appliques by using sandpaper softly.
- After the painting and drying phase, you can stick your clay applique on the tin can.
Note: If you do not want to deal with all these steps, you can buy these appliques in-store.
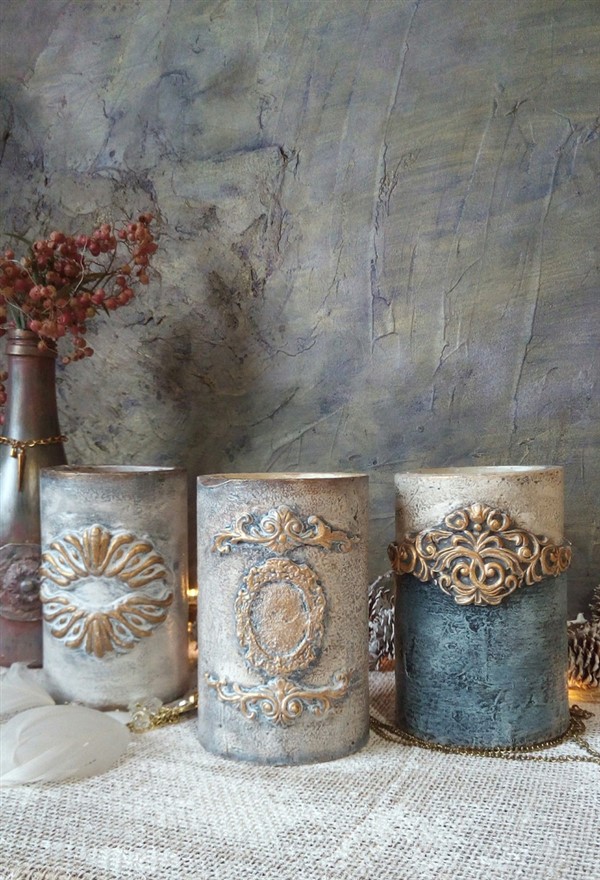
After all steps, you can put your vintage tin can planters with clay mold appliques wherever you want. Also, you can use these reliefs not only for tin cans but for any suitable surface of furniture. I am sure that this idea will also attract your children’s attention. A fun do-it-yourself idea to have an efficient time at home.


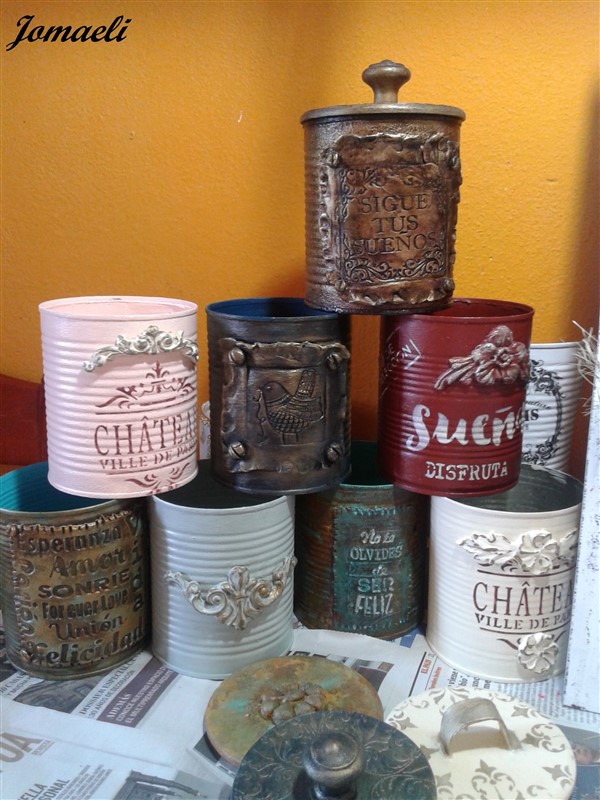


Images via: Bordado Jomaeli Acosta, Molds and Decor, Manualidades Carmen, Azul Laser, Tienda Taller, Carolina Márquez, Lala Castro, Ксения, thrift diving, idu


I love these! How did you get the texture on the cans and the paint is lovely. They look vintage for sure!
Hello Cecilia,
The figures on the tins are produced by using clay molds. Please check the article again and look for the materials you need. Now, you can look at the step by step title to learn how to do you it yourself.
These are beautiful. I can not wait to try this. I’m going on line to look for the molds. Will send you a picture when I complete them. I love this!
Thank you Brenda, we are happy to hear that you like it. We are waiting for your lovely pictures when you finished. You can send e-mail to balconydecoration@gmail.com. Good luck 🙂
Beautiful. I have quite a few Prima moulds myself that I’ll now try on my cans. I have never seen the ones your showing with writing on them. Would you mind sharing where you got them thank.
Hello Michelle,
You can find these molds from local hardware dealers or you can check on the Internet. Please check the sources that we placed at the bottom of this article. Some of them could be DIY which cannot be found on the Internet or in hardware dealers.
Thank you for getting in touch with us!
Hermoso trabajo con latas!Muy buena explicación!
what is the name of the three paint colors you used, one looks like jamaican dream. i am redoing my scrproom and these colors would look great in there,
Hello Teresa,
Thank you for getting in touch with us. I am not sure but the colour should be synthetic mars yellow and shades of it.
Thank you so much for this idea. I’m into recycling and have collected many different sized tins and have now got to the “what next” part of the project!
Your detailed instructions are easy to follow and I can’t wait to get started.
Hello Joanne,
Thank you for getting in touch with us. We are happy to hear your positive comment and you can send us your DIY photos by using our contact us page. The link is Contact Us.
I am waiting for the moulds to arrive and can’t wait to try this. Is the clay pliable after drying or do I need to shape it to the can then let it dry?
Hello, first of all, I hope you come up with some very nice things. Since it will be difficult to shape after drying, it may be more accurate to shape according to your tin can when you remove it from the mold. Good luck 🙂
Love these . Thank you for sharing . I am going to look for molds now.
Where did you get the molds with the writing on them?
Hello Tina, you can purchase any kind of molds via online shopping centers. Good luck 🙂
Can you please tell me how to make the label you have on the dark brown coffee can with “Villa de Fleur” label? Where can I get that label?
Hi Tina, I have looked everywhere for the Villa de Fluer mold, could you please tell me where to find it? Thanks, Beth
Could you tell me where you got the teal colored mold with the 4 flowers?